

In part 1 you watched AgentX work without installing anything: the demo started three daemons, passed one task between them and cleaned up after itself. This part installs AgentX for real on your own computer.
Installing is one command. The useful skill is the one that comes after it: knowing whether the installation is healthy, and if it is not, what exactly is missing. AgentX has a command for that, agentx doctor. It checks the common reasons AgentX does not work and prints a suggested fix under each problem. Most of this guide is about reading that report.
This is part 2 of AgentX in practice, a series of short guides where each part gets one thing working.
What you get at the end
- The
agentxcommand installed on your computer, at a version you can name. - A project folder with an AgentX settings file in it.
- The AgentX daemon, its background service, running and answering.
- A
doctorreport you can read, with two remaining errors that you understand. Both are about the AI model, and part 3 clears them.
What this part does not do. It does not connect a model, so no agent answers a message yet. That is on purpose: one job per part. AgentX is part of Noqta's products program and it is still experimental. You will meet one rough edge of that in step 5, and this guide walks around it.
Prerequisites
- Node.js 22.19 or newer, up to 26. AgentX refuses to start on other versions. This guide was run on Node.js 22.22.0.
- macOS or Linux. Windows is untested by the AgentX maintainers; use WSL there. We ran this guide on macOS.
- A terminal and a browser.
- About two minutes for the download.
You do not need Git, Docker, an account or an API key for this part.
How we ran it. We installed AgentX in a clean, separate home folder on a Mac that already runs another AgentX, so nothing in this guide leans on an earlier setup. To keep the two apart we moved the test daemon to port 19021 and the dashboard to port 19031. Where our output shows those numbers, yours will show the defaults: 18800 for the daemon and 4202 for the dashboard. We ran agentx setup with --no-open, which prints the dashboard address instead of opening a browser. We also shortened folder paths, trimmed a few lines of output and replaced our computer's name with my-computer.
Step 1: Check your Node.js version
node --versionOur output:
v22.22.0If the number is below v22.19 or above v26, install Node.js 22 from nodejs.org and run the command again. Node.js 20 is too old; the troubleshooting section shows the message you get.
Step 2: Install AgentX from npm
npm install -g agentix-cli@latestThe package is called agentix-cli. The command it installs is agentx. Our output:
npm warn deprecated node-domexception@1.0.0: Use your platform's native DOMException instead
npm warn deprecated domexception@4.0.0: Use your platform's native DOMException instead
npm warn deprecated prebuild-install@7.1.3: No longer maintained. Please contact the author of the relevant native addon; alternatives are available.

added 347 packages in 2m
The three npm warn deprecated lines are harmless. They are about libraries AgentX depends on, not about your installation. On our machine the install took 93 seconds.
To get exactly what this guide shows, pin the version we tested:
npm install -g agentix-cli@0.137.3AgentX releases often, sometimes several times a day, so a newer version may word a line differently. The steps stay the same.
Step 3: Confirm the command is there
agentx --version0.137.3If the terminal answers command not found: agentx, the install worked but your terminal cannot see it. The troubleshooting section has the fix.
Step 4: Run doctor in an empty folder
AgentX keeps its settings in the folder you run it from. Make a folder for it and go in:
mkdir my-agentx
cd my-agentx
Now ask for a health check:
agentx doctorOur output:
  agentx doctor

  Environment
    ✓ Node.js 22.22.0
    ✓ npm on PATH
      /Users/you/.nvm/versions/node/v22.22.0/bin/npm
    ! claude CLI not on PATH
      Only required for agents on the claude-code tier.
      → See https://docs.anthropic.com/en/docs/claude-code
    ! codex CLI not on PATH
      Only required for agents on the codex-cli tier.
      → Install with `npm i -g @openai/codex`.
    ! opencode CLI not on PATH
      Only required for agents on the opencode tier.
      → Install from https://opencode.ai/docs/.
    ✓ better-sqlite3 loads for Node v22.22.0
      NODE_MODULE_VERSION 127

  Config
    ✗ agentx.json not found
      Looked in /Users/you/my-agentx/agentx.json
      → Run `agentx setup` to create one via the web wizard.

  1 error, 3 warnings. Fix the error and rerun.
This is how to read any doctor report:
✓the check passed.!a warning. Worth reading, but it does not stop AgentX.✗an error. AgentX will not work properly until it is fixed.→the suggested fix for the line above it.- The checks come in groups. Here there are two, Environment (your computer) and Config (your settings). More groups appear once there are settings to check.
- The last line counts errors and warnings.
Doctor only checks. It does not install or repair anything.
What this first report says:
- Environment is fine. Node.js is a supported version, and
better-sqlite3, the small database AgentX stores its records in, loads correctly. That second line matters: it is the piece most likely to break when a Node.js version does not match. - The three warnings are a menu, not a to-do list.
claude,codexandopencodeare three AI coding tools that AgentX can use as an agent's engine. Each warning says the same thing: this tool is only needed if an agent uses it. You do not need all three. You may need none. - The one error is expected. There is no settings file yet, because you have not created one.
Step 5: Create the settings file
Doctor suggests agentx setup, which opens a setup page in your browser. On the version we tested, that command does not work in an empty folder. We ran it and got this:
  No agentx.json yet — the wizard will create one.
  Opening http://127.0.0.1:19031/setup

  Starting dashboard server on port 19031 (Ctrl-C to quit)…
  No agentx.json found — starting dashboard in setup-only mode.
  Visit http://127.0.0.1:19031 to run the wizard.

  Cannot read properties of undefined (reading 'enabled')
The command then exits and the setup page never loads. This is a fault in AgentX 0.137.3, not something you did. If you see that last line, use the route below. A later release may fix it; the route below works either way.
Create the settings file from the terminal instead:
agentx init agentx init
✓ Created agentx.json
✓ Created .env template
✓ Created .agentx/sessions/
✓ Created .claude/
Next steps:
1. Edit agentx.json — configure agents, channels, crons
2. Edit .env — add API keys and bot tokens
3. Run agentx daemon start — start the daemon
4. Run agentx daemon status — verify everythingWhat it made:
agentx.jsonis the settings file. It starts with one agent calledassistant, no channels and no schedules..envis where private keys go. It starts as a template with every line commented out, so it holds no key yet..agentx/is AgentX's working folder for this install: its database, sessions and records..claude/holds settings for the agent's own folder.
You can confirm the settings file is valid on its own:
agentx config check ✓ Config valid
Node: my-computer (my-computer)
Bind: 127.0.0.1:19021
Agents: 1
Crons: 0
Mesh peers: 0
Telegram: disabled
WhatsApp: disabled
✓ All workspaces validNode is this computer, named after it. Bind is the address the daemon will listen on. 127.0.0.1 means this computer only, so nothing outside it can reach AgentX. Yours says 127.0.0.1:18800.
Step 6: Run doctor again
agentx doctorThe Environment group is the same as before. From Config down, our report now read:
  Config
    ✓ agentx.json valid (1 agents, 0 schedules)
    ✗ 1 agent(s) use claude-code tier but claude CLI is missing
      assistant
      → Install Claude Code (https://docs.anthropic.com/en/docs/claude-code) or switch these agents to tier=sdk.

  Secrets
    ✗ 1 env var(s) referenced in agentx.json but missing
      ANTHROPIC_API_KEY
      → Add to .env — e.g. ANTHROPIC_API_KEY=<value>

  Workspaces
    ✓ All agent workspace folders exist

  Workspace settings
    ✓ All 1 agent .claude/settings.json files clean

  Routing
    ✓ 0 webhook(s), 0 telegram account(s) — all routing references resolve

  Notifications
    ! AgentX Helper is not installed, so banners come from Script Editor and show its icon.
      → Run agentx desktop install, then run agentx notify "Hello" --title "Test" and click Allow.

  Runtime
    ! Daemon not reachable (not running?)
      http://127.0.0.1:19021
      → Run `agentx daemon start`. Skip this check with `agentx doctor --no-running`.

  2 errors, 5 warnings. Fix the errors and rerun.
The settings file is found and valid, and there are new groups. There are also more errors than before. That is progress: doctor can now see far enough to tell you what the agent itself needs.
claude CLI is missing. The starter agent is set to use Claude Code as its engine, and Claude Code is not installed on this machine. In step 4 this was only a warning, because no agent needed it. Now one does, so it is an error. This is doctor being precise, not contradicting itself.ANTHROPIC_API_KEYmissing. The settings file refers to a key that the.envfile does not contain yet.AgentX Helper is not installed. Shown on a Mac only. It is about desktop notification banners and is optional.Daemon not reachable. A warning, and the only line you fix in this part. The background service has not been started.
Both errors are about the same thing: the agent has no AI model to think with. Connecting one is the job of part 3. Leave them for now.
Step 7: Start the daemon and check it
The daemon is AgentX's background service. It receives messages, runs agents and sends replies. Start it in the background:
agentx daemon start --detachDaemon started in background (PID: 33860)
Logs: tail -f /tmp/agentx-daemon.log
Stop: agentx daemon stopThen ask how it is:
agentx daemon status my-computer (my-computer)
Status: running — uptime 9s
AgentX 0.137.3 (c2e6a0a) node my-computer
Running since 2026-10-13 10:05 (Africa/Tunis), 9s ago, pid 33860
Last restart 2026-10-13 10:05, first start on record
Restarts 1 today, 1 in the last 7 days (on record since 2026-10-13 10:05)
Build on disk dist newer than process: no
Service none (started from a terminal, nothing starts it again)
Agents:
Assistant (claude-code)
/Users/you/my-agentxTwo lines are worth reading closely:
Status: runningis the one you want.Service: none (started from a terminal, nothing starts it again)is honest about a limit. You started the daemon by hand, so if the computer restarts, the daemon does not come back by itself. That is fine for now.
Run doctor a third time. The last group changes:
  Runtime
    ✓ Daemon healthy — 1 agents live, uptime 0m
      http://127.0.0.1:19021
    ✓ Daemon finds ffmpeg to measure phone recordings

  2 errors, 4 warnings. Fix the errors and rerun.
The Daemon not reachable warning is gone, replaced by Daemon healthy. The two model errors remain, as expected.
Step 8: See the same report in the browser
AgentX has a browser dashboard, and the doctor report is on it. Now that a settings file exists, agentx setup starts the dashboard without the fault from step 5:
agentx setup Found agentx.json — the wizard will extend your current install.
Opening http://127.0.0.1:19031/setup
Starting dashboard server on port 19031 (Ctrl-C to quit)…
Live dashboard: http://127.0.0.1:19031
(bound to localhost; no auth token — safe default)Leave that terminal open; it runs the dashboard. Your browser opens the setup page. Do not fill it in yet: that is part 3. Instead, open /admin/health on the same address (for you, http://127.0.0.1:4202/admin/health) and select the Doctor tab.
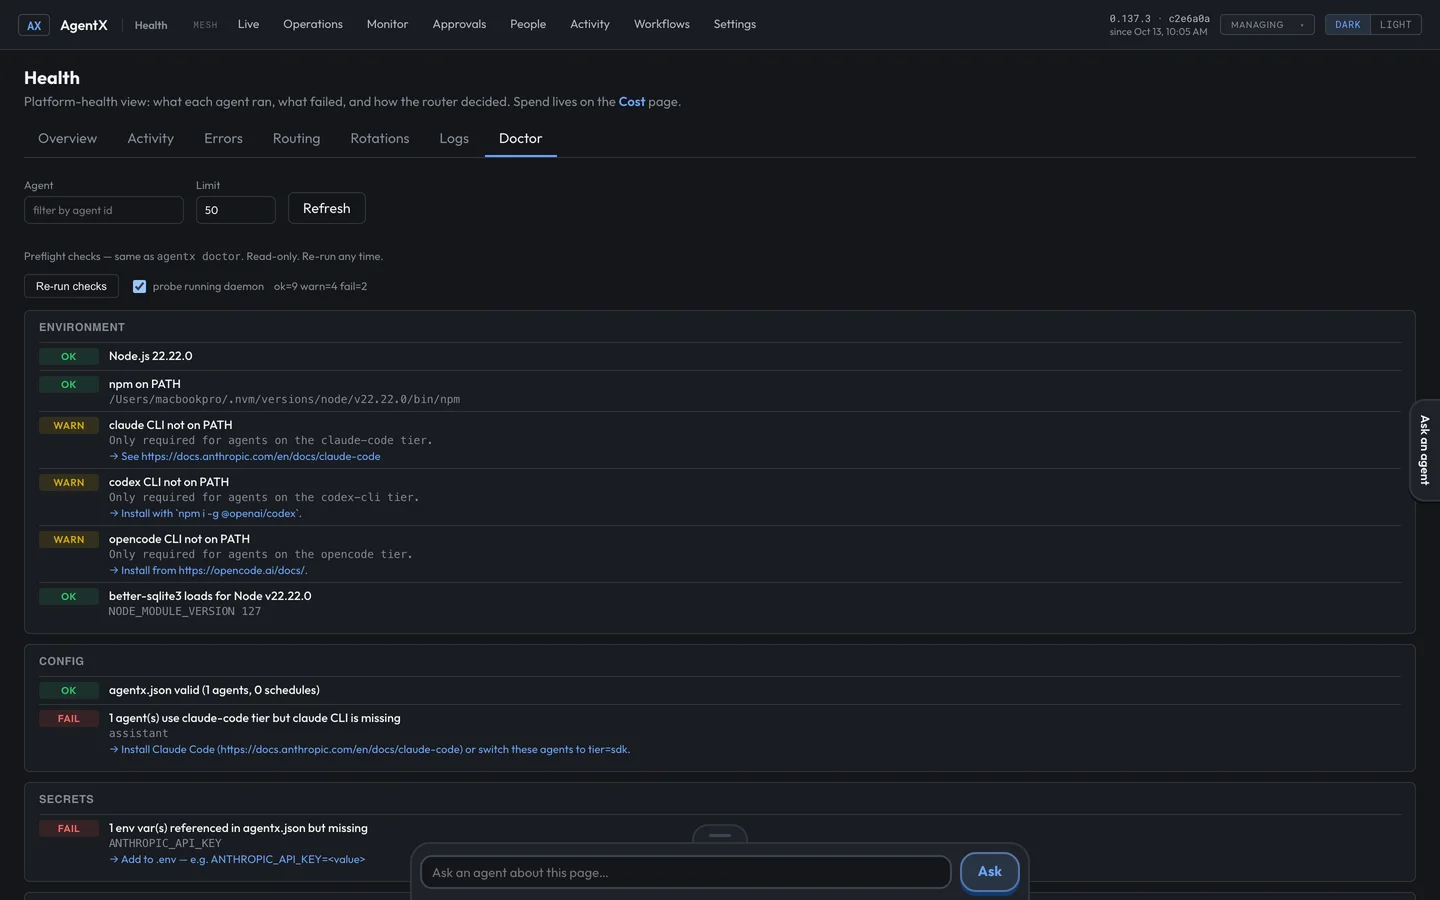
It is the same set of checks, with OK, WARN and FAIL in place of the three marks, and a Re-run checks button. The summary reads ok=9 warn=4 fail=2, which matches the terminal: 2 errors, 4 warnings.
Then open Live in the top bar.
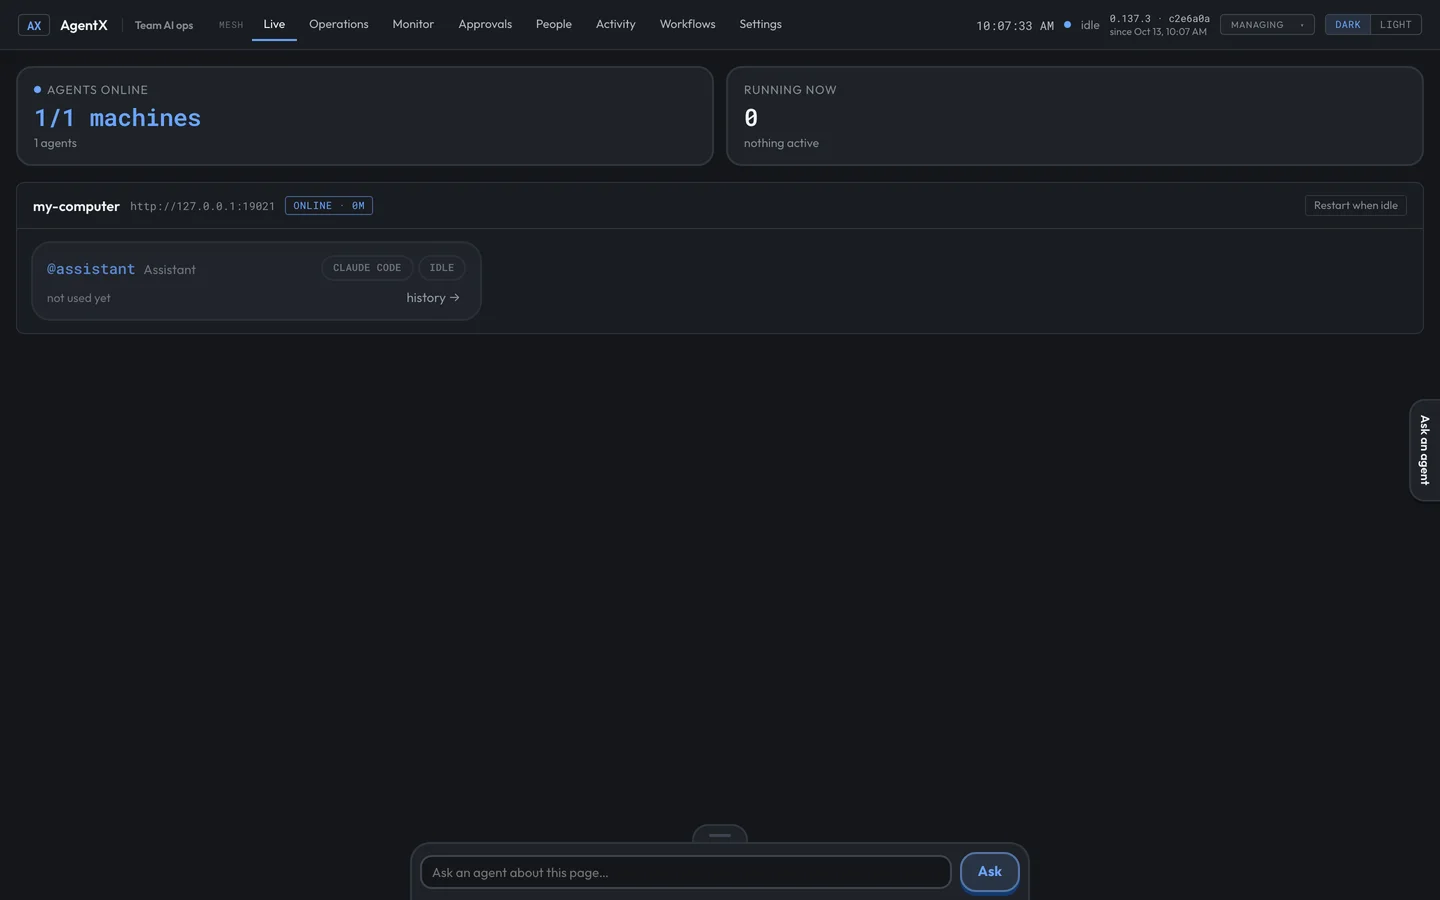
Live shows 1/1 machines and one agent, @assistant, marked IDLE and not used yet. In part 1 this page showed three simulated machines. This one is yours.
When you are done, press Ctrl-C in the terminal that runs the dashboard. The daemon keeps running; it is a separate program.
Step 9: Stop the daemon
agentx daemon stopDaemon stopped (PID: 33860)agentx daemon status then says AgentX is stopped and reminds you how to start it again. Run these commands from your my-agentx folder: AgentX finds its daemon through the settings file in the current folder.
Useful doctor options
Both were run for this guide on 0.137.3.
| Option | What it does |
|---|---|
agentx doctor --no-running | Skips the check that the daemon answers. Use it when you stopped the daemon on purpose. Our report dropped from 5 warnings to 4. |
agentx doctor --json | Prints the same checks in a format other programs can read. Each check has a severity, a group, a title and, where there is one, a fix. |
Doctor ends with exit code 1 when there is at least one error. A script can rely on that.
Check it worked
agentx --versionprints a version number.agentx doctorshows✓ agentx.json validunder Config.- With the daemon started,
agentx doctorshows✓ Daemon healthyunder Runtime. - The only
✗lines left are the two about the model: the missing engine and the missing key.
If all four are true, AgentX is installed and running, and you know exactly what stands between you and a working agent.
Troubleshooting
AgentX needs Node.js 22.19 or newer, up to 26. This is Node.js 20.20.2. We reproduced this by running the same agentx on Node.js 20. Every command, including agentx doctor, stops with that one line. Install Node.js 22 and check with node --version.
command not found: agentx. The package is installed, but the folder npm puts commands in is not on your terminal's search path. We reproduced it by removing that folder from the path. Find the folder with:
npm prefix -gThe agentx command is in the bin folder inside the folder it prints. Add that bin folder to your PATH, or open a new terminal if you have just installed Node.js.
Cannot read properties of undefined (reading 'enabled') after agentx setup. This is the fault from step 5. It happens on 0.137.3 when the folder has no agentx.json. Run agentx init first, then agentx setup.
Daemon not reachable (not running?). Start it with agentx daemon start --detach, from the folder that holds your agentx.json. If you stopped it on purpose, use agentx doctor --no-running.
agentx.json not found. You are in a different folder from the one where you ran agentx init. Doctor prints the path it looked in; cd to your my-agentx folder.
npm install -g fails with a permission error (EACCES). We did not reproduce this one. It happens when Node.js was installed system-wide and npm may not write to its folder. Installing Node.js through a version manager such as nvm avoids it.
Remove it again
We tested this too. From your my-agentx folder:
agentx daemon stop
npm uninstall -g agentix-cli
removed 347 packages in 2sThat removes the command. It does not touch your project folder: agentx.json, .env, .agentx and .claude stay where they are, along with AGENTS.md and CLAUDE.md, two instruction files that were in our folder by the end of the run. Delete the my-agentx folder if you want nothing left. If you are continuing to part 3, keep everything.
Watch it
The second Learn AgentX video covers installation: youtu.be/arOqm5bB1Lw.
Next in the series
Part 3 creates your first agent: it connects an AI model, which clears the two errors doctor still shows, and sends the agent its first message. Until then, the AgentX documentation is at github.com/anis-marrouchi/agentx.
Conclusion
You installed AgentX, created its settings, started its background service and read its health report three times, watching it change as each piece fell into place. You also saw what a health check is for: it turned "it does not work" into two named lines with a fix under each.
If you want agents running on your own team's tools, installed, checked and kept healthy for you, talk to us.